| Pioneer | Visible |
| Expert | Visible |
| Simplified | Visible |
| Management | Visible |
| Business | Hidden |
The DevOps Extension library provides capabilities linked to DevOps tools and processes. The current set of features cover Issue and Project Tracking software only, and is focused on the creation of work items from Mitigations identified as part of the Roadmap. The initial implementation supports only Azure DevOps, but additional solutions are going to be added to the list in the near future.
Note
The DevOps Extension Library follows the naming convention used by Azure Boards. Based on this naming convention, a Work Item is an item used “to track anything you need to track. Each work item represents an object stored in the work item data store. Each work item is based on a work item type”.
The main DevOps interface is available from the Analyze ribbon.
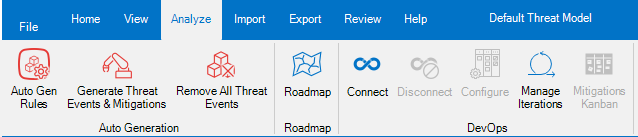
Connecting with the DevOps system
The first button, Connect, allows to Connect to a DevOps system.
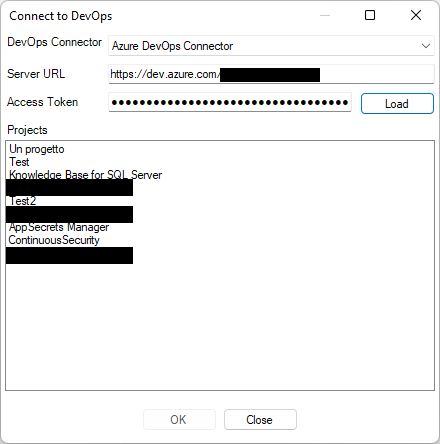
To connect, you have to select first the DevOps Connector to use. Right now, only Azure DevOps Connector is provided. Then you have to specify the URL of the server. Finally, you have to include the Personal Access Token in the Access Token field:
- For Azure DevOps, please follow the guidance published on Authenticate with personal access tokens – Azure DevOps | Microsoft Docs: the Azure DevOps Connector requires the Read & Write right over the Work Items. It is highly recommended to grant access to the specific organizations, and not to all of them. The duration should also be limited in time.
After having filled all items, the Load button becomes available. Click it, and after a short while the list of Projects will be loaded with the available projects. Select the one of interest and then click OK.
Tips & Tricks
The selected connector, the URL and the project are saved with the Threat Model. The Access Token instead is saved in the Registry in an area for the user, protected by ACLs. Moreover, it is encrypted with DPAPIs for the user. Therefore, if you give your Threat Model to another user, she would need to specify her own Access Token, to connect to the project.
When you open a Threat Model which has been connected to a DevOps system, the DevOps Extension Library connects automatically to it, provided that the Access Token is available, otherwise you have to connect to it explicitly.
Disconnect from the DevOps system
The second button, Disconnect, allows to disconnect from the DevOps system. This allows to remove references to it from the Threat Model, which may be useful before providing it to a third party.
Configure the DevOps system connection
Before you can take full advantage of the DevOps system connection, you have to configure it. This can be done using the Configure button in the Analyze ribbon. This will open the DevOps Configuration dialog.
To use it, you have first to identify the work item which would act as parent for the work items to be created for representing the Mitigations selected for implementation. To select it, you can select the first characters of its name, and then select it from the list. For the Azure DevOps Connector, you have to type the first 3 characters to trigger the load of the said list. In our example, it would mean to type “wha”. If everything is correct, you will see a Parent Item Type: in our case, it is a Feature.
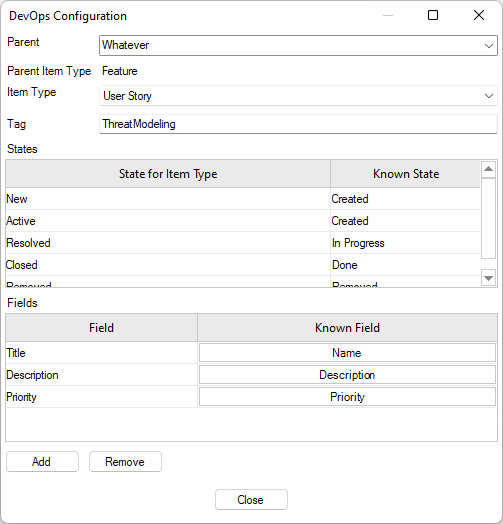
Then you have to select the type of the items to be created to represent the Mitigations. In our case, it would be a User Story. This will load the States and the Fields mappings. Both are required to allow the DevOps Extension Library to understand how to map the specific concepts related to the selected DevOps system and Item Type with the more general concepts adopted by Threats Manager Studio and the DevOps Extension Library.
The standard States supported by the DevOps Extension Library, also known as Known States, are:
- Unknown, which is used for undefined states.
- Created, which identifies work items which have been just created and have not yet been planned nor started.
- Planned, identifies the work items which have been planned.
- In Progress, is the status characterizing the work items which have started but have not yet concluded.
- Done, identifies the work items that have been finished.
- Removed is used to identify those work items which have been removed from the backlog.
Tips & Tricks
The tool tries to map all the possible states for the selected Item Type to one of the Known States. The mapping will not necessarily be complete or correct for all scenarios, therefore it is recommended to double check the assignments.
Note also that mappings to the Unknown state will be essentially ignored.
The Fields mapping allows to decide how to create the work items associated to the Mitigations. The example above instructs the DevOps Extension Library to create User Stories having:
- Title assigned from the Mitigation’s Name.
- Description assigned from the Mitigation’s Description.
- Priority assigned from the Mitigation’s Priority, as defined by the Roadmap. For the Azure DevOps Connector, a Short Term mitigation will have Priority 1, a Mid Term will have Priority 2, and finally a Long Term mitigation will have Priority 3.
The DevOps Configuration dialog allows to add new Field mappings using the Add button, or to remove existing ones with the Remove button. If you press the first, the Field Association dialog will be opened.
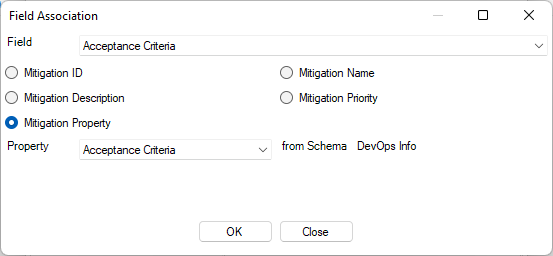
To add a new Field association, you must first identify the field from the selected Item Type, in our case a User Story, using the list of Fields retrieved from the DevOps system: in our case, we have selected the Acceptance Criteria. Then you can select the content which should be used to fill the Field. You can choose between the ID of the Mitigation, the Name, the Description, the Priority (that is the phase of the Roadmap where the Mitigation has been assigned), and a property retrieved from some Schema. In our example above, we have created a custom schema called “DevOps Info”, containing a property named “Acceptance Criteria”, which we can use for our goal. Now click OK to confirm and close.
After the configuration is finished, you can click the Close button of the DevOps Configuration dialog, to close it.
Manage Iterations
The next button opens the Manage Iterations dialog. It is initially empty: to load the definition of the Iterations, you can use the Initialize or the Auto Load from DevOps buttons. If you click the latter, the DevOps Extension Library will load the definition of the Iterations from the selected DevOps system. An example is shown below.
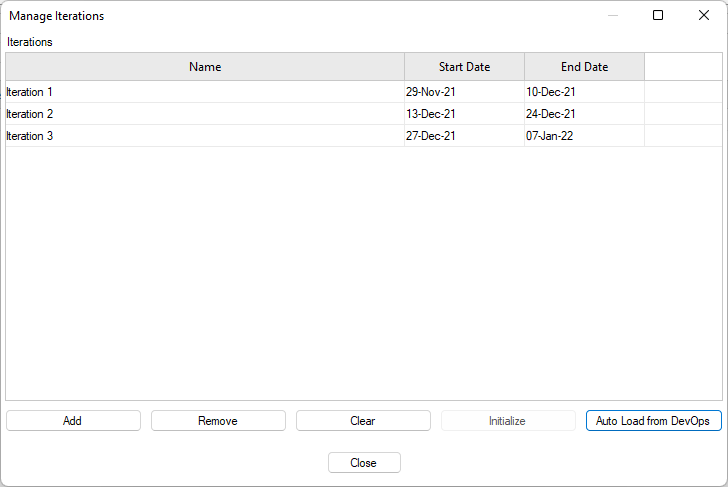
The Manage Iterations functionality could be used also without a connection with the DevOps system. In that case, you may use the Initialize button to define the Iterations through a few simple parameters which can be seen below.

It is also possible to use the Add button to manually add Iterations. The interface provides also Remove and Clear buttons, to respectively remove the selected Iterations or all of them.
Tips & Tricks
Changes to the configuration of the Iterations are not reflected into the DevOps system. You can therefore safely play with them as necessary.
The Mitigations Kanban
The Mitigations Kanban is the main tool to create work items out of Mitigations, to change their status or to get the latest updates related to their status. When you open it, you would initially see all the Mitigations in the Roadmap under the Unknown section. If you think that some Mitigations may already be present in the DevOps system, you may want to use the Automatic Retrieval to get them and update the status of the Mitigations accordingly. You can create a new work item for any Mitigation, by dragging and dropping it under the correct state. Typically, it would be Created, at first. Then you can move status by dragging the Mitigation and dropping it to the correct destination. Moving back the Mitigation to Unknown will remove the work item. The DevOps Extension Library asks for confirmation before proceeding.
ATTENTION
If multiple states for the Item Type map to the same Known State, then the DevOps Extension Library will pick one of them arbitrarily, which typically is the first one. It is a responsibility of the DevOps Connector to decide, therefore there is no specific rule.

Tips & Tricks
If the Mitigations do not look correct, for example because one or more of them has a different status than expected, then try to use the Automatic Retrieval button to fix it. In fact, this may be due to some changes made on the work items. The Automatic Retrieval button makes the required inferences to align work items with Mitigations, and therefore put everything under control again.
ATTENTION
If you change the Title of any work item, the Automatic Retrieval may not be able to recognize it and therefore to link it to the corresponding Mitigation.
The Mitigations Kanban is structured in two main areas. The upper area of the screen is represented by the Kanban itself, and shows the different Mitigations in their different states. The lower area shows details about the selected Mitigation, and is split in three areas:
- On the left, you can see the details of the Mitigation itself.
- On the center, you see where the Mitigation has been applied.
- On the right, you can see the eventual messages for the associated work item, retrieved from the DevOps system.
In the Ribbon, you have the following buttons:
- The Synchronize button allows to retrieve updated information related to the associated work items. Please note that this button may fail to retrieve updates, if the stored identifier of the work item is not correct for any reason. A typical cause may be the removal of the work item from the DevOps system.
- The Automatic Retrieval button allows to synchronize the Mitigations with the content of the DevOps system. For those Mitigations which do not have a valid identifier for the associated work item, this action tries to identify another suitable work item, using the name of the Mitigation.
- The Short Term Mitigations, Mid Term Mitigations, and Long Term Mitigations buttons allow to focus respectively on the Short Term, Mid Term and Long Term Mitigations, by hiding all the others.
- The All Mitigations button shows all the Mitigations.
- The Refresh List button refreshes the list of Mitigations, without calling the DevOps system.
ATTENTION
Consider that all changes of status done within the Mitigations Kanban are applied immediately to the DevOps system!
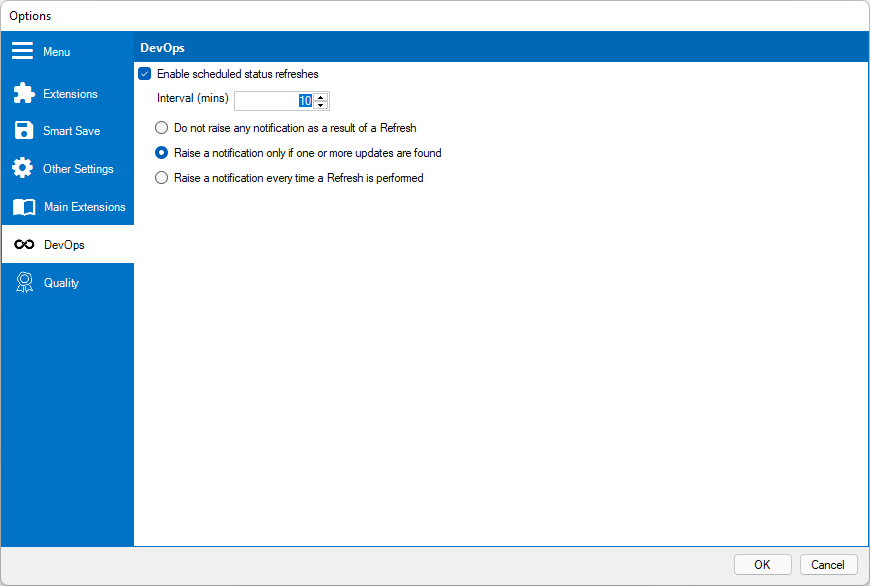
Configuring the DevOps Extension Library
The DevOps Extension Library has a configuration setting which can be found among the Options. This configuration allows to enable regular refreshes of the status of the work items, and the interval between refreshes. Essentially, this executes a Synchronize every X minutes. The configuration allows also to define how the refresh process should raise notifications: every time, only when a change is detected, or no notification should be raised.
Integration with the Roadmap
The DevOps Extension Library is integrated with the Roadmap tool in various ways:
- It provides additional filters to select Mitigations belonging to specific Iterations.
- It provides commands to assign all Mitigations which have not been already assigned to Iterations, to the current or the previous Iteration.

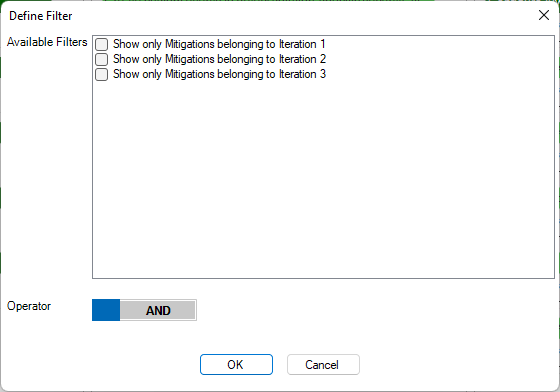
The first capability is available from the Filter Mitigations button in the Roadmap ribbon. It opens the dialog shown below. It allows to select one or more filters, and to choose how to combine them, using an AND or an OR operator.
The second capability is available from the following buttons in the Roadmap ribbon:
- Assign new Mitigations to current Iteration, which allows to assign all Mitigations which have not yet assigned to a specific Iteration to the current one.
- Assign new Mitigations to the previous Iteration, which allows to assign all Mitigations which have not yet assigned to a specific Iteration to the previous one.
- Unassign all Mitigations from Iterations, which allows to remove eventual assignment to Iterations from all Mitigations.
