A Threat Model is not useful if it produces a list of Mitigations without an indication on how to prioritize them. In fact, every Team struggles due to limited resources, and Security has necessarily a lower priority than Functional Requirements. The Roadmap tool is how Threats Manager Studio (TMS) addresses this need.
The Roadmap is most typically used at the end of the Threat Modeling process, after the Mitigation identification phase has been completed. To open it, you can use the Analyze ribbon.

The Roadmap tool is a page split into two main areas: the upper one contains five panels (Not Assessed, Short Term, Mid Term, Long Term, and No Action Required), and the lower one split into three panels (an Item Editor, a list of Threat Events and a bar chart), initially empty.
Tips & Tricks
Short Term, Mid Term, and Long Term do not indicate specific periods: you may decide the meaning you want to attach to each of them.
For example, you may decide that Short Term means the next Sprint, Mid Term means after the first Sprint and within the current year, and Long Term indicates activities to be implemented even later than that.

When you start the Roadmap tool for the first time, you typically see most Mitigations listed under the Not Assessed panel, and they are typically blue with white text; you may also see some mitigations in the No Action Required panels, typically white with black text. If you select any Mitigation, you will see in the lower left quadrant of the screen the details of the Mitigation, in a read-only Item Editor. The lower middle quadrant will also list the Threat Events where the said Mitigation has been associated.
Configure Risk Estimator
Before starting with the actual definition of the Roadmap, it is best to configure the Residual Risk Estimator: an Extension providing logic to evaluate the Risk qualitatively. TMS provides only a Residual Risk Estimator: the Bug Bar Residual Risk Estimator, which operates using simple algorithms based on the value of the IDs of Severities and Strengths. Other Residual Risk Estimators may be provided as additional Extensions.
To configure the Residual Risk Estimator, you have to click the Configure Risk Estimator button in the Roadmap ribbon. This opens a simple interface, where you will be asked to select your preferred Estimator and then fill in some parameters.
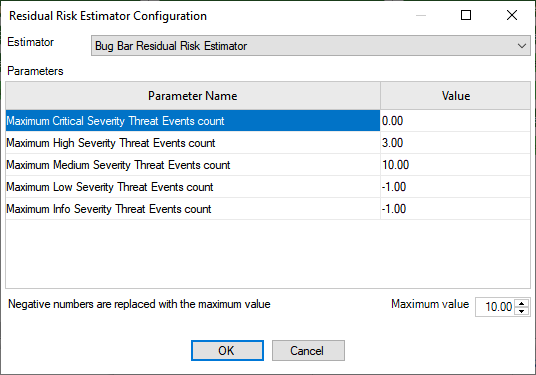
The Bug Bar Residual Risk Estimator requires to provide as parameters the maximum number of Threat Events that are considered acceptable, for each Severity level. If the specified number is negative or higher than the Maximum value, then the latter is used.
This allows the Risk Estimator to define the level of Acceptable Risk. For example, the values set in the picture above, that is 0 Critical, 3 High, 10 Medium and -1 Low and Info Severity Threat Events, define an Acceptable Risk of 3 * 75 + 10 * 50 + 10 * 25 + 10 * 1 = 985.
When you close the Residual Risk Estimator Configuration dialog, the chart in the lower right quadrant is filled with the estimated Severity for each phase of the Roadmap, and the Acceptable Risk is also shown as a horizontal line. If the bar representing any phase is over the Acceptable Risk line, then it is colored red, otherwise is green.
Another effect of the configuration of the Residual Risk Estimator is that the Mitigations in the upper section of the Roadmap tool are colored based on how effective they are in reducing the overall Risk: the most effective third of the Mitigations gets a dark green background and white text; the second third of the Mitigations gets a light green background and black text; finally, the least effective third gets a white background and black text. This allows you to easily discriminate the Mitigations you should focus on.
At this point, you simply have to move each Mitigation from the Not Assessed panel to the other panels, based on when you decide they need to be implemented.
Export for Azure DevOps
Button Export for Azure DevOps exports the mitigations selected for the Short Term, Mid Term and Long Term periods into a CSV file formatted to allow importing within Azure DevOps. To use the generated file, you will need to open the Queries board in Azure DevOps for your project, and then click Import Work Items, as discussed in https://docs.microsoft.com/en-us/azure/devops/boards/queries/import-work-items-from-csv?view=azure-devops.

It will create one Task for each Mitigation, with no parent.
With version 1.5.0, three additional “Export to Azure DevOps” buttons have been introduced. They respectively allow exporting the Short Term, Mid Term, and Long Term mitigations. They are useful for those situations when importing is done in phases.
Extensibility of the Roadmap interface
Other Extension Libraries may further extend the interface of the Roadmap panel. In fact, in the figure below you’ll notice that the DevOps Extension Library has added three buttons:
- Assign new Mitigations to current Iteration, which allows to assign all Mitigations which have not yet assigned to a specific Iteration to the current one.
- Assign new Mitigations to the previous Iteration, which allows to assign all Mitigations which have not yet assigned to a specific Iteration to the previous one.
- Unassign all Mitigations from Iterations, which allows to remove eventual assignment to Iterations from all Mitigations.
Those three buttons are associated with the concept of Iterations, which is most proper of Agile methodologies like Scrum. For more information, please refer to the documentation related to the DevOps Extension library.
