| Pioneer | Visible |
| Expert | Visible |
| Simplified | Visible |
| Management | Hidden |
| Business | Hidden |
The Quality Extension library provides a tool called Calculated Severity, to automatically calculate the current Severity for Threat Events. You need to install this Extension library separately from the Threats Manager Studio (TMS), from Downloads.
How the Calculated Severity is determined
The Calculated Severity determines the current severity for a Threat Event by considering the Severity of the associated Threat Type, and then reducing it by considering the effect of all the Mitigations already existing, that is those having Existing or Implemented status. For example, let’s consider a Threat Event which is associated to a Threat Type having High Severity. Each Severity level has a value, which corresponds to the Id which can be found in the Severity List. Here are the default values for the various Severities, for your convenience:

This Threat Event is associated to 3 Mitigations:
- The first Mitigation is Proposed and has an Average strength.
- The second one is Existing and has a Weak strength.
- The third one is Implemented and has a Weak strength.
Given this situation, only the second and third Mitigations need to be considered to evaluate the current Severity, because of their status. Both Mitigations are Weak. Each Strength has a value, which corresponds to the Id which can be found in the Strength List. Here are the default values for the various strengths, for your convenience:

Given that we have 2 Weak Mitigations, the overall strength of the Mitigations is 50. In fact, you have to add up the strengths to have the overall value. The current strength can be calculated as follows.

In other words, in our example the current Severity would be equal to 75 (High Severity) multiplied for 1 minus 50 divided by 100, which means 37.5. This number does not correspond to any standard Severity, therefore there is the need to map it to a Severity level. The approach is to get the least severe standard Severity that has Id equal or higher than the value, and that is visible: in the table above, all Severities but VeryHigh and VeryLow are visible. Those two are present only for compatibility with sources like MITRE CAPEC. So, in our case the final current Severity would be Medium.
How to enable the Calculated Severity
The Calculated Severity can be enabled in the Options, and more specifically in the Quality page. Please ensure that the Enable support for Calculated Severity flag is checked. This configuration is related to the Threat Model and is saved with it. In other words, you have to enable it for each and every Threat Model.

After you enable the Calculated Severity, you will see a section going by that name in the Item Editor.

In the previous example, you can see two buttons: the first one with text Apply Medium Severity, and the second one with Adjust Severity. The first button shows the calculated Severity, and it is visible only if it differs from the current Severity for the Threat Event. If you click it, then the proposed Severity is applied to the Threat Event. The second button allows to open the Adjust Severity dialog and specify an adjustment to the evaluation.
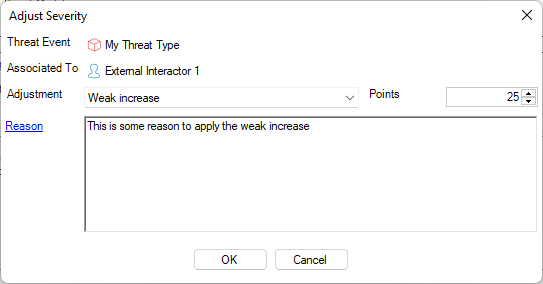
Adjustments allow to compensate the Mitigations and are used to identify situations where the Severity should be different from the calculated one, for some reason. For example, because a storage contains data which is more sensitive than normal, or because there are conditions which make some mitigation less effective. The adjustment is relative to the Mitigations Strength and compensate it. That is, for our example a Weak compensation means that the calculation becomes 75 (High Severity) multiplied for 1 minus 25 (50 points from the Mitigations less 25 from the compensation) divided by 100, which means 56.25, which translates to High. This means that due to this adjustment it is ok now to have High as Severity for the Threat Event, and therefore the Apply Medium Severity button disappears from the Item Editor. You can see below the result.
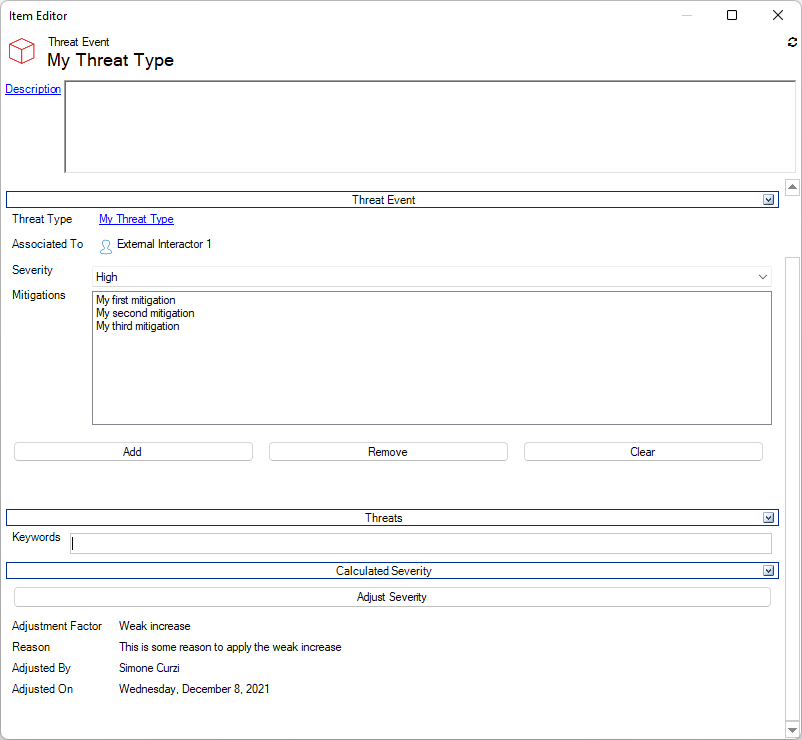
It is also important to note that the Adjustment is clearly represented in the Item Editor.
To remove the Adjustment, you have to click the Adjust Severity button again, and then choose Nominal as Adjustment Factor.
The Calculated Severity List
The Calculated Severity List is a new tool available from the Review ribbon. You can use it to see at a glance all those situations where the Calculated Severity differs from the current one.

The recommended approach with this tool, is to use it to evaluate all the suggestions, eventually add Adjustments where required, and then use the Apply Calculated Severity button to apply the recommended values to all Threat Events.
Additional capabilities
The Quality Extension Library provides additional features, besides those described here. For more information, please refer to:
