Threats Manager Studio (TMS) is a Threat Modeling tool that provides superior efficiency and effectiveness. But how can you practically use it to create your own Threat Models? This article is the second in a series to answer this question, by showing a complete process since the diagramming phase. The previous article is available from here.
With the previous article, we prepared a first diagram of our sample system. We have already agreed that this diagram is pretty simplistic. While that is useful for our purposes, because makes easier to understand what happens, it may lead someone to the false assumption that all Threat Models would look that way. Typically, you would want to get more details. There are situations, though, where you would want to maintain the analysis at a ten thousand foot level: for example, if you need to perform a reasonable Threat Model in a few hours.

Using the Automatic Threat Generation
That set aside, this time we’ll focus on a different question. That is, how to identify Threats and Mitigations.
First of all, during the previous article we have took steps to ensure you installed the Automatic Threat Generation Extension library before importing the Template. Now, this allows us to create Threats and associate standard Mitigations with the click of a button. So, please go to the Analysis ribbon and click the Generate Threat Events & Mitigations.

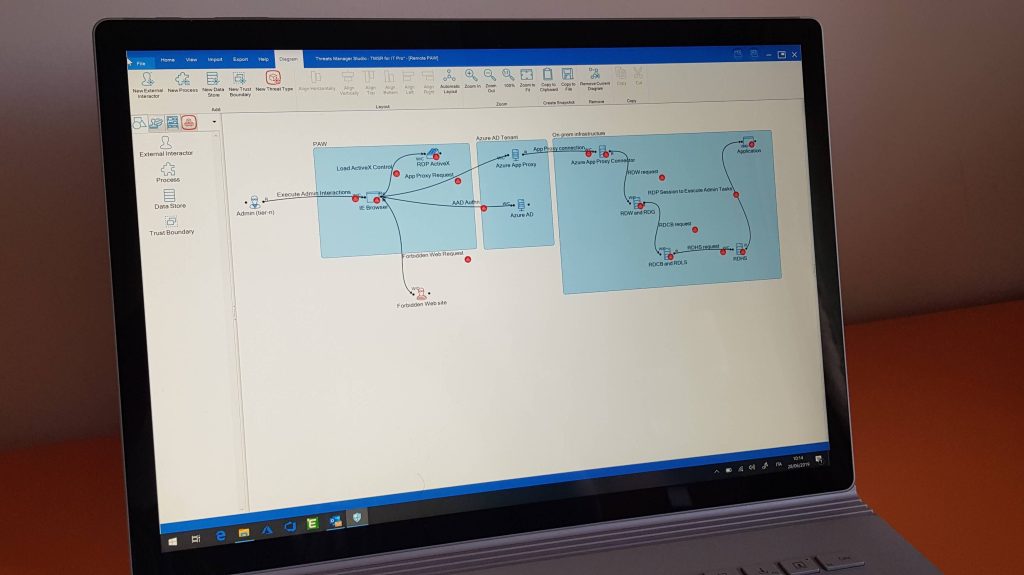
The Threat Event Markers
If you open the Diagram, you will notice that most Entities and Flows are now associated small colored circles with tiny boxes, called Markers: those circles represent the fact that now those objects have identified Threats and Mitigations. The color is red, if all identified Mitigations have no Mitigation assigned; if at least a Mitigation has been assigned, but not all Threat Events have enough Mitigations, then the color is orange; and finally, it is green if all Threat Events have enough Mitigations.

The next questions should be pretty obvious: when a Threat Event is considered to have enough identified Mitigations? TMS calculates it by considering the Strength of each assigned Mitigation. If you look at the Strength List, you’ll notice that each Strength has an ID, from 0 of Negligible to 100 of Maximum. If you add those IDs, you get the total theoretical effectiveness of the identified Mitigations. This number does not consider the status of the Mitigation. Thus it represents the Residual Risk if all identified Mitigations are implemented. Therefore, a Threat Event has enough identified Mitigations if their total theoretical effectiveness is 100 or higher.
Threat Events have also markers, represented as small circles with a single box in it. Again, their color is obtained by comparing the theoretical effectiveness of the assigned Mitigations with 100: if it is zero, then the marker is red; if it is equal or over 100, then the marker is green; in all other cases it is orange.
The intent of those markers is simply to gently push you to add more Mitigations to Threat Events. If you do not feel comfortable or you do not want to discuss them when you are showing the Threat Model to others, simply click the Toggle Markers button in the Diagram ribbon to hide them.

Reviewing Threats and Mitigations
Now that you have done the first step with generating the Threats and Mitigations, you need to review the generated Threats and Mitigations. Why do you need to do that? Actually for many reasons:
- Threats have an assigned current Severity which may not be correct.
- Most Mitigations have Undefined Status.
- Some Mitigations may be wrong.
- Some Mitigations may be missing.
- You may need to add details to Threat Events and Mitigations.
The best tool to perform this phase is the Threat Event List. Occasionally, you may also need to use the Mitigation List. You can find them all in the Home ribbon.

Let’s start with the first. When you click the Threat Event List button in the Home ribbon, you get a multi-level table. The first level shows all Threat Types having at least an assigned Threat Event. The second level of that table shows the associated Threat Events. And finally the third level shows the assigned Mitigations.

You need to open those levels and analyze each Threat Event, one by one, with this process:
- Look at the Mitigations and assign a Status. For guidance on the Status to use, please refer to the documentation. No Mitigation should have Undefined status.
- For each Mitigation, double check the Strength: is it correct and in line with the definition you can read in the Strength List?
- Review the Severity assigned to the Threat Event. More specifically, consider the Mitigations that are in status Existing or Implemented. How would you rate the Residual Risk based on the Bug Bar as defined in the Severity List?
- If there is any Threat Event with no Mitigations, try to identify at least one. If the Threat Event has some Mitigations, can you find another or more? Consider that sometimes there are Standard Mitigations for the Threat Event which have not been automatically included, because they are not so frequently applied, but that may be ok for your scenario. Sometimes you may decide to apply some Mitigation that is already included but has not already been used for that specific Threat Event. Or you may even identify some other Mitigation that has not yet been included in the Threat Model.
- Consider the identified Mitigations for each Threat Event and their Control Type: are you representing at least one Preventive, one Detective and one Corrective? If not, this could be an opportunity to add more Mitigations.
- Look at the whole Threat Type and to the related Threat Events: do you see any Threat Event with different Mitigations than another Threat Event? It may be ok, but you need to justify this. Do to that, if the Threat Model does not already include a Property Schema allowing you to add notes, you may want to create one yourself.
- Continuing to look at the level of the Threat Type, do you see any difference between the Strength or the Status of the assigned Mitigations? For example, you may have transport encryption only for external flows. Again, if it is correct document it.
- Finally, sort the whole table by Severity. Would you say that the order is correct and that Threat Types that are considered having an higher Severity of other Threat Types, really have higher Severity for your scenario?
The Mitigation List
You may also use the Mitigation List during this phase. This tool allows you to look at the various Mitigations and compare them. This may highlight discrepancies, like for example the adoption of a SIEM to collect and analyze the various security events which may be listed as Existing in some cases and Proposed in others. Again, discrepancies may be totally fine, but please document them.

Next Steps
We have arrived at the end also for this article. At this point, we need to discuss even more ideas about how to complete your Threat Model. This is the topic of the next post.

Leave a Reply