
Threats Manager Studio (TMS) is a Threat Modeling tool that provides superior efficiency and effectiveness. But how can you practically use it to create your own Threat Models? This article is the third in a series to answer this question, by showing a complete process since the diagramming phase. The previous article is available from here.
With the previous two articles, we prepared a first diagram of our sample system and we have shown how to use Templates to automatically create Threats and assign Mitigations. We have seen the activities you are supposed to do, to update the severity of the Threat Events and the status of the Mitigations. We have also discussed how you should use the Threat Event List and the Mitigation List to ensure that all the various evaluations of Severity, Strength and Status are aligned among the various Threat Events and Mitigations.

Now, we have just entered the most creative phase of the Threat Modeling experience. The intent is to use your knowledge and experience, to identify the potential problems that have not been identified by the automated generation.
During the interviews, you have hopefully gained much more knowledge than required to draw the diagram.
This series is about how to use TMS for your Threat Modeling. Still, there is a phase of Threat Modeling that is so important to require a dedicated post, even if TMS does not support it: the Interviews. For this reason, we are going to add a “bonus” post at the end of the series, dedicated to this delicate phase. We’ll link it here when posted, for your convenience.
Additional Threats Identification
Before starting, we recommend to get a look at the resulting Threat Event List.

Think about the various problems you have identified and see if they are already covered.
Let’s assume that the discussion has identified the following problems:
- We note that the Template does not include the risk of a malicious actor impersonating a legitimate User, due to lack or insufficient Authentication. This is a vulnerability that would allow the malicious actor to get access to the information related to the User and potentially change its information.
- The User is supposed to upload files to Azure Storage. To do that, it uses a Storage Account Key that is embedded in the Static Content Web App, and thus it would be available to everyone. This is a vulnerability that would allow a malicious actor to get full access to the Azure Storage, by using the said credentials. The Threat here is the possibility to get access to documents uploaded by other users, and even to change them by injecting malicious code.
- Even without considering the previous vulnerability, a User may still be able to send a document with a malicious payload to Azure Storage. The consequence may be very similar to the one discussed with the previous point, but the cause is very different and thus the Mitigations would be different.
Of course, we may identify a lot of other problems during the Interviews phase: those three are here just as an example of three common scenarios.
The first shows a typical situation that happens because the Templates are necessarily not complete. In fact, each one of them identifies only a set of Threats and mitigations for the specific context. This may be addressed by importing other Templates, or by simply adding what is missing. We’ll see in a moment the process to do that.
The second problem is a consequence of the specific design of the solution. This is something that may not be covered by a Template and that will require you to really understand the solution in scope.
Finally, the third problem is a different angle to the same Threat discussed with the second problem. The difference between those two is mostly on the actual Vulnerability, but at the end of the day both imply having a malicious payload stored in some file uploaded to Azure Storage. How should we handle this? Shall we create a different Threat or can we use the same one and just specify different Mitigations?
We’ll see all those situations in the rest of this post.
Completing the Knowledgebase
As discussed in the first article of this series, Templates define a Knowledgebase for the Threat Model, to help you better representing the system in scope and to guide you and simplify the identification of Threats and Mitigations. Depending on the Templates you have selected, the resulting Knowledgebase may be more or less complete. Of course, this will be even more true in the initial months of life of TMS, because of the lack of available Templates.
IMPORTANT
Help your fellow Threat Modelers using TMS by sharing your Templates with them! Use Template Upload to submit.
There are techniques to identify if there is the need to integrate the Knowledgebase with additional Threats. A simple one may be to adopt STRIDE classification.
| Category | Desired Property | Definition |
|---|---|---|
| Spoofing | Authentication | Impersonating something or someone else |
| Tampering | Integrity | Unwarranted modification of code or data |
| Repudiation | Non Repudiation | The ability to claim to have not performed some action against the solution |
| Information Disclosure | Confidentiality | Exposure of information to unauthorized users |
| Denial of Service | Availability | The ability to deny or degrade a service to legitimate users |
| Elevation of Privilege | Authorization | The ability of a user to elevate her or his privileges with an application without authorization. |
You may use the STRIDE by Element approach, as discussed in The STRIDE per Element Chart by the SDL Team.

By applying this approach to the User, it would be clear that the identified Threats did not include anything related to Spoofing. For this reason, we may need to add something like the first problem discussed above. To do that with TMS, you need to follow this process:
- Identify the involved object, which in this case may be External Interactor “User” or a Data Flow like “Send Request”. Both may be ok, but the first may be best if you had multiple situations where the Threat would apply. It may be best to target the “User” entity, because there are two different Flows that may be affected by this Threat.
- Select the chosen object and click button Add under the Threat Event list shown in the Item Editor for that object. This opens the Select Threat Type dialog.
- Select Assign a new Threat Type.
- Type the name of the Threat Type in the Name field.
- Type the description of the Threat Type in the Description field. This is optional but strongly recommended, because it plays a major role in defining the Threat Type.
- Choose the standard Severity for the Threat Type, in the Severity field. This is not necessarily the current Severity for the new Threat Event you are creating. For example, if you know that the user is authenticated with name and passwords, that there are strict policies for the quality of the password and that the said password is changed often, you may decide that the Severity for the Threat Event is Medium. In other situations, though, you may have worse conditions. I’ve seen customers forcing passwords to exactly 8 characters, all lower case, due to the specific configuration of the RACF system they adopted. In that case, the Severity would be High, or even Critical. You need to put here the typical Severity you expect for this issue.
- Click the OK button. This creates a new Threat Type and a new Threat Event, associated to the selected object.

- Now you need to identify the most proper Mitigations. To do that, double click the Threat Event you have just created from the Threat Event list in the Item Editor for the selected object. This opens an Item Editor dialog.
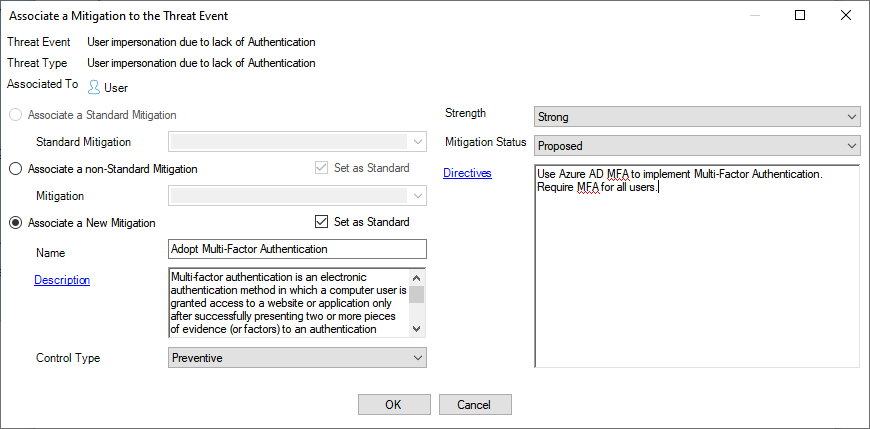
- Click the Add button in the Mitigations list under Threat Event section in the Item Editor dialog. This opens the Associate a Mitigation to the Threat Event dialog.
- Given that the Threat Event is new, option Associate a Standard Mitigation is disabled. Click Associate a non-Standard Mitigation and then open the related combo box. This will show all the Mitigations defined in the Knowledgebase. You can search for the right one by typing some filter, and browse the list. If you find anything suitable, simply select the Strength and the Mitigation Status, fill in some additional info required using the Directives, and you are done.
- If no existing Mitigations suits you, click Associate a New Mitigation, fill in the Name and Description, select the most proper Control Type, the Strength and the Mitigation Status, fill in some additional info required using the Directives, and you are done.
- Click OK to close the dialog.
- Repeat this process to cover all Threats and Mitigations.
Threats Specific to the Solution in Scope
The second category of problems is related to those Threats that are specific to the Solution in scope. A different solution based on the same technology would not have those Threats. Because they are a consequence of the combination of assets, business goals, processes and of the design adopted for the solution. As such, they cannot be identified by any Template. This is where the Threat Modeling process excels over other approaches.
The “magic” typically happens during the Interview phase or as part of the Analysis that follows the interviews. While it is not the goal of this post to discuss this process at length, besides what is covered by TMS, it may still be interesting to get some glimpses about how it works. Let’s start from the specific Threat we have identified above and that falls in this category:
The User is supposed to upload files to Azure Storage. To do that, it uses a Storage Account Key that is embedded in the Static Content Web App, and thus it would be available to everyone. This is a vulnerability that would allow a malicious actor to get full access to the Azure Storage, by using the said credentials. The Threat here is the possibility to get access to documents uploaded by other users, and even to change them by injecting malicious code.
How is it typically identified? There are keywords you must understand. In our example, one of those keywords is Storage Account Key. When the Architect you are talking with talks about the design of the solution, you should be at the lookout for keywords like this one. Some of them, you may know already. In that case, you need to understand how those features are applied, because they may be in line with the expected behavior, but they may very well represent a problem. On the other hand, if you don’t know what a Storage Account Key is, you have to search for it. Try to search for security implications of adopting it: what is it allowing to do? Can you limit the rights and scope? What is the recommended way to access Azure Storage? What happens if the Storage Account Key is stolen? Those are only some of the questions you shall ask yourself.
In general, the point is to apply a Critical Mindset: if you do not know something, ask and search for it. Never assume. And first and foremost, be self-critical.
When you have identified the new Threat Events and Mitigations, you can simply apply the process discussed above.
Same Threat, Different Vulnerabilities
The third scenario discussed in this post is related to the situation where the same Threat may be caused by different Vulnerabilities. In our example, we have identified this situation with those two problems:
- The User is supposed to upload files to Azure Storage. To do that, it uses a Storage Account Key that is embedded in the Static Content Web App, and thus it would be available to everyone. This is a vulnerability that would allow a malicious actor to get full access to the Azure Storage, by using the said credentials. The Threat here is the possibility to get access to documents uploaded by other users, and even to change them by injecting malicious code.
- Even without considering the previous vulnerability, a User may still be able to send a document with a malicious payload to Azure Storage. At the end of the day, the consequence may be very similar to the one discussed with the previous point, but the cause is very different and thus the Mitigations would be different.
The common Threat Event, here, could be applied to the Store a file to Azure Storage Flow, and may be defined as such:
| Name | Files with malicious content are uploaded to Azure Storage |
| Description | A malicious actor may be able to upload files to Azure Storage, by stealing credentials allowing access to it or by any other means. The attack may also be executed by internal users like disgruntled employees, or which have had their computers compromised by other malicious actors. |
| Severity | High |
There are various factors that should be considered for the Severity of this Threat. In this case, the probability is high, considering that high-privileged credentials are essentially exposed. Given that the documents are processed by custom code and not by a desktop application, it may be somewhat more complex for an attacker to understand how to compromise it. For this reason, the Severity has been considered High and not Critical.
The first problem may very well require the definition of a second Threat Event, to account for the Information Disclosure risk. Considering the intent of this post, we can safely ignore this additional Threat Event for our purposes.
Let’s return to the Tampering risk represented by the potential upload of documents embedding malicious code. The two problems describe it as a result of two different Vulnerabilities: the first would be the availability of the Storage Account Key, while the second would be misplaced trust on a malicious insider. While the Threat would be similar, the potential damage may be different due to the different intent of the two categories. The first attack would be executed by an external malicious actor, which may cause more damage, while the second would be caused by a malicious insider, which may be somewhat self-restrained by deterrent controls in place, like the awareness of potential consequences if caught. This means that we need to make a decision:
- Should we describe a single Threat Event? That would be easier to manage, but it may miss the intricacies of the two different attack scenarios.
- Should we describe two Threat Events? That would allow to differentiate the Severity and to include additional details, but it may introduce complications due to the proliferation of similar Threat Events.
The second approach may sound better, but what happens if instead of two scenarios we have three? What if we have ten? What if we have many Threat Events in the same situation? Probably, there is no right approach, here, but Threat Modeling can be quite a complex experience. Sometimes it is better to simplify the model than to seek accuracy, because the latter approach would increase the cost. For this reason, I would recommend to go for the first approach, where you would have only a single Threat Event.
Sometimes you may need to add further clarifications. For example, the Threat Event as described above implies may scenarios without really committing to any. This is of course intentional. But what if you need to keep track about the specific scenarios you have considered? That would be essential, to understand at a later stage the reason why you have selected specific Mitigations and why you have assigned that Severity. To address this need, it is recommended to add metadata to Threat Events, for example as a Notes property. TMS supports the possibility to add metadata on the fly, by using the concept of Property Schemas. So, let’s do that and create a new Property Schema with a Notes property, as shown below.
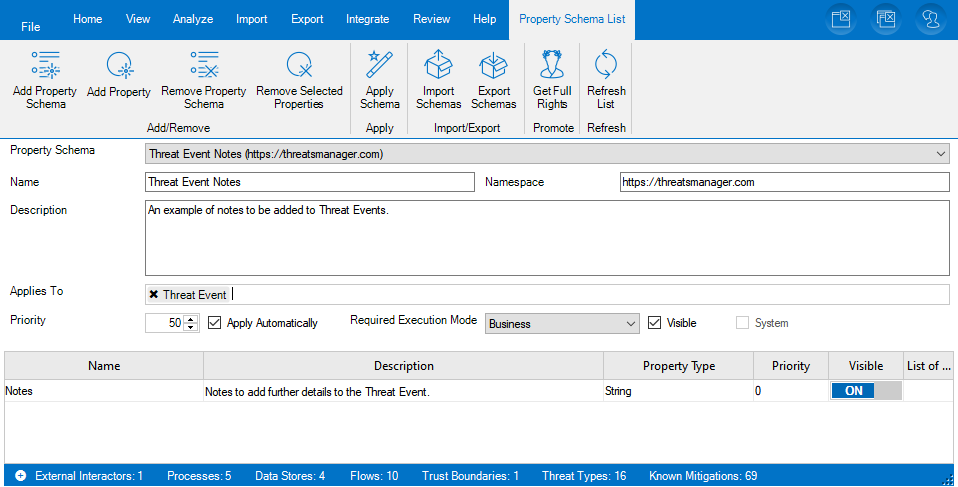
After having created the Property Schema and the Property, it is important to click on the Apply Schema button, to ensure that existing Threat Events receive it. Now, if you return to the diagram and click on the circular mark near the Store a file to Azure Storage label, you will be able to select the new Threat Event named Files with malicious content are uploaded to Azure and then you will be able to see and edit the Notes text field under Threat Event Notes in the Item Editor for the Threat Event. At this point, you would be able to specify what Vulnerabilities this Threat Event is related to, and the reason for the specific Severity.
Now it’s the time to focus on the Mitigations. The idea is to focus on the first Vulnerability, first: the availability of the Storage Account Key. What to do to address this? Replacing the Storage Account Key with something more secure, of course! The ideas may be many:
- If the user is internal and has an Azure AD account, we may recommend to authenticate the user directly. In fact, this could be the best approach.
- We may generate a SAS Token dynamically, through a API to be built with that intent. The Javascript executed by the browser would send an authenticated request to that API to get a SAS Token which would grant access to a specific location dedicated to the user for the time that is strictly required to upload the file. This is actually a Cloud pattern, called Valet Key.
- We may store a SAS Token in the Static Content Web App: that SAS Token would have limited life and would be regularly renewed at each new deployment. For example, if your organization has a 2 weeks deployment cycle for production, you may generate SAS Tokens lasting slightly more (like, 15 or 20 days). On top of that, you will need to ensure that the uploaded documents are removed from the Azure Storage after being processed by the Data Processing Azure Function.
All those Mitigations are Preventive Controls. You should consider what other Control Types you could add. For instance, tracking who used each credential would be an important Detective Control for Non Repudiation. It may even be possible to associate Machine Learning approach to determine abnormal usage patterns and tag them as potential risks.
The second Vulnerability – excessive trust placed on users – may foster similar considerations. Again, the best mitigation to this vulnerability is to remove it. This could be accomplished in several ways, including:
- Validate all files uploaded by users with an Anti-Virus.
- Check if the files have executable streams and reject them if found. For example, PDF files may embed code which would be executed by the reader. If you do not expect those executable streams, their presence would represent a good indicator of the presence of malicious content.
- Analyze the structure of the file and reject it if it does not correspond with expectations. For example, if the expected file is a text and instead you are receiving an executable, then something is off.
Again, all those Mitigation are Preventive Controls. Potential Detective Controls include raising an Alert whenever a file is identified as being at risk by one of the previous checks. Corrective Controls may include temporarily disabling an account which has been seen to send potentially malicious content, while waiting for an investigation to occur.
Next Steps
A lot has been discussed as part of this post and a lot more needs to be discussed. At this point, we need to introduce some tools you have at your disposal to validate the quality of the Threat Model you have produced and to discuss it with your Stakeholders. This is the topic of the next post.

Leave a Reply